White Willow Photography

5 Things to know before becoming a Photographer

The last thing you want is to be surprised by your photographer. Next thing you know you aren’t getting what you paid for, or worse… Your photographer shoots with a Canon camera!! I’ll try to keep my bias for Nikon out of this but so on and so forth. Keeping these 5 things in mind while booking your photographer might save you.

1. Know the style you want.

Okay imagine this… Kelly wants photos of her wedding, so she hires one of the first photographers she comes across. She sits down for a whole hour explaining the type of photos she wants. After her wedding she loses it because her photos don’t look exactly how she imagined it. Don’t be a Kelly, PLEASE. Now it’s good to have expectations of your photographer, but don’t ask your photographer to change their style to what you want. A photographer can’t change their style willy nilly. Instead find a photographer that matches what you’re looking for.

If you don’t know the style of photos you want, try searching Instagram or Pinterest for some different styles you like. Maybe just pick something that will match the walls of your living room, that you impulsively painted a shade too close to brown.

2. Photos? What about everything else?

Now that you know what style of photos you want, what about everything else? There’s more to your photo shoot than the photographer showing up and taking your photo and calling it a day.

It’s important to clarify some things before booking your photographer. Each photographer works differently, so it’s good to be on the same page for the day of your photo shoot. Try asking questions like, “Do you deliver digital files I can download?” or “How long does it take to get our images after the shoot?” or even ask if they offer prints or albums. This will help clarify all the unknowns before picture day.

3. Budget

Photographers charge money, and sometimes it feels like a lot of money. But that’s a conversation for another time. Here are some things to clarify about expenses. Are there additional expenses? Travel fee? How much is the deposit? And finally what is their cancellation and refund policy? These questions will help you stay out of any sticky situations. I hate sticky situations.

4. Reviews

This one’s kind of obvious but make sure to check out what others are saying about the photographer you’re considering hiring. This will help you know what you might be getting yourself into. This will also help you determine the strengths and weaknesses of your photographer.

5. Personality

I saved the best for last. Photographers come in all shapes and sizes. To get the best possible outcome for your photo shoot, find the photographer that matches your personality. There’s quiet and loud photographers, there’s photographers that blend into the background and there’s photographers that aren’t scared to join in on the dance floor. Find a photographer that will make you the most comfortable on your shoot. Most photographers express their personality pretty quickly through email or text, or even a video call.

With these 5 tips I have no doubt you’ll find the right photographer for you!
How to download Images on Pixieset

How to Download images off Pixiset

Downloading your photos off Pixieset can be tricky, and it really shouldn’t be. Today I’ll quickly show you how to correctly download them for each device.

Why download your photos?

When your photographer send you your photos it’s easy to just download the ones you want. however that link doesn’t last forever. Download them and put them on a safe USB. As a photographer I keep the images backed up on multiple hard drives because clients come back to me because they forgot to download them all and now I need to send them photos again. Don’t be that person.
 

Laptop or Computer

This is probably the easiest way to download the files off Pixieset. It works best because often when you download a lot of files it puts them in a zipped folder. Anyway let’s get to it!

To download the photos you can find the download icon (arrow pointing down towards the line) This is where pixieset will ask you to put in an email. I don’t believe Pixieset will send you promotional emails but your photographer may. Your email is used to keep track of your favourite list. You can either download all the photos or  selected from your favourite list.

After that you pick what size of photos you want to download. I recommend downloading the original size (High Res) of photos. Then you get to pick where to download the photos to. I only have experience downloading the photos to the computer but I’m sure the other options are self explanatory. If the files you downloaded are in a zipped file either double click and open the file or right click and click extract all.

Iphone 

I’ve had some difficulty downloading images on Iphone off Pixieset. If you’re able to just download the photos onto a computer and then airdrop them or send them to your phone. If you do want to download them onto your phone go through the same process and get them on your phone by hitting the download icon in the top right corner. You then have to find the zipped folder in your files on your phone. After that you have to open the file and move the photos to your camera roll.

Hope this helps!

If you’re still having problems I would love to help you through it a little more! 

3 Reasons to book a mini session

FIRST OF ALL, WHAT’S A MINI SESSION?

A Mini Session is simply just a normal photo shoot but broken down to a shorter time. Many Photographers do this to give more people an opportunity for a photo shoot. Also Mini Sessions give the client(s) a taste of what a full length photo shoot could look like. While still giving the client a couple amazing images!


IT’S THE PERFECT FIRST STEP

Many people are hesitant to book a full session due to the reason they can be pricey at times. This stops many people from ever getting pictures with their loved ones. Mini Sessions are much more affordable. Giving clients that are on the fence about booking a shoot a chance to experience the photo shoot and see if they would be interested in a full session.

2. THE PERFECT GIFT

Whether it’s a birthday or anniversary or just a way to let someone know you care, a Mini Photo Shoot can be a great gift for your loved one or friend. Not only is it a unique gift, but it’s also one that lasts forever. A photo can be posted, printed, and hung up on the refrigerator. You can even buy a gift card or get a gift receipt from White Willow Photography.

3. FUN EXPERIENCE

Everyone can remember back to those times when they were little kids and their moms made them sit still for a picture in the most uncomfortable clothing. Well, most photo shoots are no longer like that. Each session should be fun and without stress. Often clients bring along their dogs and you can image there is never a dull moment. With your Mini Session there will be nothing but smiles.

NOW IS YOUR CHANCE…

Mini Sessions are running this summer in Winnipeg, Canada. There’s a limited amount of blocks, so make sure you get your photo shoot this summer!

Why does my Art suck ?

Whether you’re a photographer, painter, or any other form of artist, we all get that horrible feeling as we scroll through our Instagram and see everyone’s art that’s so much better than ours. Is my art that bad? How do I improve?

WINNIPEG WEDDING PHOTOGRAPHER

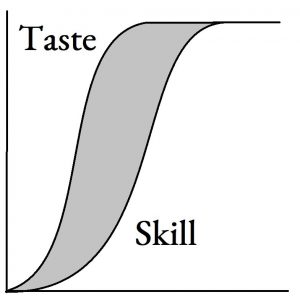
In grade 9, I picked up a camera for the first time. I didn’t have any intention of becoming a Winnipeg Wedding Photographer but rather wanted something to help pass the time. I later created an Instagram (@carltons.captures) where I started to share these photos. I’m convinced that if it wasn’t for the people in my life that told me I was taking amazing photos, I would have probably quit. It was because I was convinced that I took the most breathtaking photos ever that kept me going. For many people this is the case starting out in their area of art. That is until you get exposed to other people’s art. More and more, I would scroll through my social media feed saturated with amazing photography, and I started to realize where my skill level was compared to amazing artists. What happened was my artistic taste developed faster than my skill. This is what’s called the gap.

This isn’t an original idea, and I wish I could tell you who came up with this idea. To recap, as early artists, we are exposed to a lot of amazing art. Our creative taste develops faster than our skill which makes us set higher standards for ourselves. We are no longer happy with the art we produce. The sad part is that many people stop practicing and producing art because they feel like their art sucks. This doesn’t just happen for early artists, but also for people with higher developed skill.

On the graph below you can see a visual on how your Taste develops faster than your Skill leaving a gray area we call the Gap.

THE SOLUTION

Lucky for us, there’s a solution. We need to cease comparison when it comes to other artists in our field as much as possible, instead, compare ourselves to the art that was produced yesterday. Comparing yourself to your earlier art is an easy way to ensure you’re improving. Another way to prevent being stuck in the gap is to distance yourself from the places you normally compare yourself to others, this may be Instagram, Facebook, etc. Do your best to continue to develop your skill and do what you love!

Switching your Camera over to manual mode

For starters…

Photography in life is incredibly important! The fact that everyone has a story to tell makes photography so valuable. The best way to do this is on manual mode.

You might be thinking, I got this setting that automatically changes my settings, why not use that? Manual mode gives you full control of the outcome of your photos, and will make a world of difference. Although it may be scary, switch your camera to Manual mode. Manual is controlled with 3 main settings called the “Pillars of Photography” Aperture, Shutter Speed, and ISO. All of them control what’s called exposure. I do not expect you to be an expert after this, trust me, it took me a while. The definition of exposure is the amount of light reaching the sensor or more simply, how bright your photos are. If you’re hearing this for the first time that’s great, take some notes and soak it all in. If you already know how to use manual mode, I still think you’ll be able to learn a lot.  Today we are going to learn how to balance each of these settings to get the right exposure you want and the best outcome for the photo.

Aperture

This is probably the most complicated setting you’ll have to master and understand. Aperture is often explained as the pupil of the camera. Our pupils get larger when there is less light and smaller when there’s more light. Aperture is the opening of the lens.   The way we control aperture on our camera is with the setting called F-stop. I might use Aperture and F-Stop interchangeably. Aperture also controls another aspect of photography. This area is called Depth of Field (how much is in focus) ,our eye also works like this. With a small depth of field we got less in focus. Bigger depth of field is having more of your image in focus. This means if you have a beautiful landscape and want all the mountains in focus you would use a bigger depth of field.

This is where you might get confused, a small opening in the lens is controlled with a large aperture number giving you a bigger depth of field but also because the opening is smaller it will let in less light. If you want a nice landscape photo where everything is in focus then you would have a large F-stop number but will make your photo darker, or if you want a nice picture of a flower but don’t want all the background details being distracting then using a small depth of field will allow the flower to be in focus while the background is not.

Take your finger and hold it up close to your face, if you focus on your finger notice the background being super out of focus. That would be an example of a small depth of field. Holding your finger farther away makes more of the background in focus which would be an example of a bigger depth of field.. Just to make it more confusing they control a big opening in the lens with a small F-stop. Let’s recap…

Bigger F-stop Ex. F/24

Letting in Less Light               Smaller Lens Opening

Bigger Depth of Field             More in Focus

Smaller F-stop Ex. F/2.5

Letting in More Light               Bigger Lens Opening

Smaller Depth of Field            Less in Focus

Ingrain this idea of smaller aperture number means more light which means smaller depth of field and vice versa. We will touch on when to use what aperture towards the end, so don’t worry about that. If you understand this so far, great if not we will work on it more so don’t worry.

So turn on your cameras and try and find your F-stop setting. If you aren’t already, turn your camera to manual. We are going to try to take a photo with a small depth of field and a large depth of field. Keep in mind when you try to take a photo with a large depth of field it might get to dark.

Shutter Speed

Much simpler than aperture, shutter speed is simply the speed at which the photo is taken, also how long the “shutter” is open letting light come in to the sensor. For fast moving objects you need a faster shutter speed, for slower objects you don’t need that fast of shutter speed. Your shutter speed has to be set depending on the light around you. Our eyes automatically adjust to the lighting around us whether it be outside or inside, however your camera on manual mode does not. So you must think to yourself, what am I photographing and how much light is around me. If I’m taking a nice photo of one of my friends playing basketball outside during the day my shutter speed will be on the higher end. If you have too slow of shutter speed with a moving focal point, the outcome will be a blurry photo. In some instances you want motion blur however most of the time you want a nice crisp photo. That’s pretty simple right? Well what happens when you want to take a nice photo of your friend playing basketball but instead of it being outside, it’s in a poorly lit gym. Put the shutter speed too high and you will get a dark photo, put the shutter speed to low and you will get a blurry photo. This is when ISO comes in.

ISO

Iso stands for “International Organization of Standardization” which is totally not important. What you do need to know about is grain or digital noise. Think sand on a photo, or maybe a TV without signal. ISO essentially brightens a photo but at a cost, more you brighten an image the more digital noise you add. However, it’s still better to be able to have a properly exposed image (right lighting in a picture). So if you set your aperture to the right setting and got your shutter speed for the amount of movement in the image but it is still too dark. Then you start bumping up your Iso. 

How do all these settings work together you ask? Great question, the answer is we learn to balance them.

Balancing

Consider this analogy, getting the right amount of light in your image is like filling a bucket with water. The bucket being the sensor of your camera. Your aperture (remember it’s the opening of the lens changing depth of field) is the hose filling the bucket with water, with a bigger hose you fill the bucket quicker and with a smaller hose you fill it up slower. Shutter speed is the amount of time you have to fill the bucket, a longer shutter speed and you have longer to fill the bucket (remember too slow of shutter speed means a possibility for blur). Where does ISO come into this analogy? Well ISO is the size of the bucket. Higher ISO means you have a smaller bucket to fill (remember this gives you a grainer photo). With this analogy try to imagine filling the bucket but trying not to get Blur/Grain. You have probably noticed that each of the three settings talked about above changes the amount of light in your image in one way or another.  I’m going to give you the steps to make it easier to set up your settings. This way of thinking makes it much less overwhelming. First we study the prop and or model. This could be a mountain range in bright light or a picture of your dog in dark lighting. 

cropped-Tree-Only-Black.png

Shoot me an Email

I would love to hear from you!

Carlton Reimer

whitewillowphotos@gmail.com

204-292-2388